List Box
This function block controls a list box in an HMI, which allows the user to select one of the contained elements.
The input bShow is used to show or hide the HMI object. It is enabled with a HIGH signal on the input bEnable and disabled with a LOW signal. The inputs bSelect and IIndex are used to select a list element. If a HIGH signal is connected with bSelect then IIndex determines the position of the selected element. No element is selected when an invalid index is written to IIndex. A LOW-HIGH edge at the inputs bUp and bDown scrolls the list page by page up and down. A HIGH signal is written to the outputs bUpEnab or bDwEnab when it is possible to scroll in the corresponding direction.
The inputs iNBmp, iSBmp, iText, sText and IData are used to create new or change the existing list elements. The first element of each vector that is connected with one of these inputs configures a feature of the first list element. And the second elements of the vectors define the second list element and so on. The bitmaps for not selected list elements are set at input iNBmp. And the vector that is connected with iSBmp defines the bitmaps of the selected elements. The labels are specified at the inputs iText and sText. And the vector at IData contains the data for the list elements. If a HIGH signal is written to bSet then the settings in the vectors are assigned. The existing list elements will be changed or new ones will be added. The number of list elements after the assignment corresponds to the minimum length of the connected vectors. If some inputs are not connected then the values of the predefined elements or default values are used. Resource texts prevail over plain texts and combinations of data and plain texts, i.e. if a resource ID different to “not defined” is assigned then the corresponding resource text is displayed. The language of the bitmap and text resources is set at input iLang.
The index of the selected element is written to OIndex. If no element is selected then -1 is output. The data of the selected element are provided at OData. The length of the output is limited to 17 characters.
HMI object
The HMI object displays a vertical list with single element selection. Two bitmaps for the states “selected” and “not selected” as well as a text can be assigned to every list element.
If a font with anti-aliasing is used, in addition to the foreground color, several gradations up to the background color are used to smooth out edges during text output. If the resulting glimmering of the background color interferes when the text is displayed over the bitmap, it is recommended to change the background color or to choose a font without anti-aliasing.
Parameter
The mask designer is called as the parameter dialog via the context menu of the block. An HMI object of the type "List Box (unicode)" is assigned to the block by creating or selecting it. With the checkbox in the lower left corner you can switch between global and instanceable assignment.
Default settings for the HMI object are made in the corresponding dialog, which appears after "Additional settings …". The tabs in the upper left corner are used to switch between the two views of the dialog.
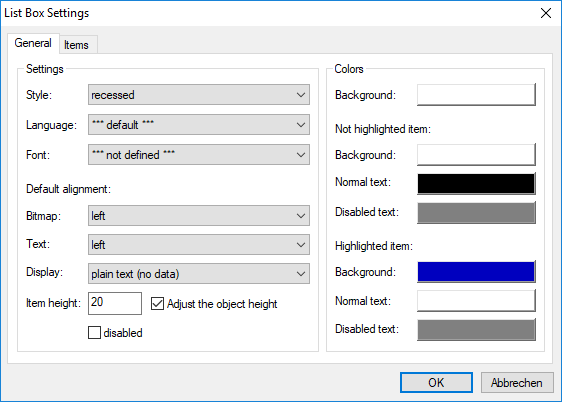
The global settings for the HMI-object and the list elements are entered in the view “General”. The frame and the background color of the list box as well as the default value for the language and the font for the text outputs belong to them. Different background colors can be assigned to selected and not selected list elements. Not only selections but also an enabled or disabled list box can be highlighted with the text color. The default values for the alignment of the bitmaps and texts as well as for the display of data and plain texts are used to uniformly configure all predefined elements. These settings will also be used when further elements are added to the list via the function block. The height of the elements is specified in pixels. After activating the option “Adjust the object height” the list box is shortened to a multiple of the height of the elements. The other option is used to disable the list box.
The second view contains the predefined elements. The context menu provides commands for the adding of new elements as well as the editing, deleting, selecting and moving of existing ones.
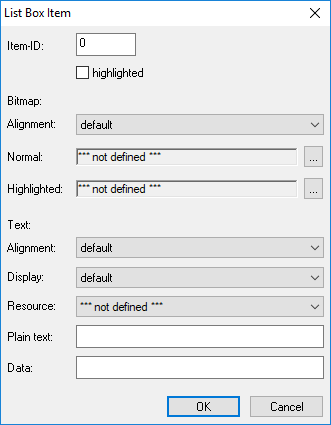
The definition of the single elements happens in its own dialog. The index of the list element is specified after “Item-ID”. The first element gets the index 0. The option “highlighted” is used to select the element. Furthermore, the two bitmaps, a text and a data string can be assigned. The element can be labeled with a resource text, a plain text or a combination of data and plain text. If a resource text is specified then it will be output. The plain text or a combination of data and plain text are only displayed if the resource text is set to “not defined”. The output of the plain text and the data is configured in the “Display” setting. Every list element can get its own alignment and display parameter. The global parameter will be used if “default” is chosen. Then all elements can be uniformly formatted.
Signals
| Name | I/O | Type(s) | Function |
|---|---|---|---|
| sText | I | TEXT | Plain text vector for labeling the elements |
| iText | I | WORD | Text resource vector (ID) for labeling the elements |
| iData | I | WORD | Data vector for the elements |
| iSBmp | I | WORD | Bitmap resource vector (ID) for selected elements |
| iNBmp | I | WORD | Bitmap resource vector (ID) for not selected elements |
| IIndex | I | WORD | Index of the element that is to select |
| bSelect | I | BIT | Select the entry IIndex |
| bShow | I | BIT | Show/hide object |
| bEnable | I | BIT | Enable/disable |
| iLang | I | WORD | Language resource (ID) |
| bSet | I | BIT | Set the element definitions |
| bUp | I | BIT | Scroll upwards |
| bDown | I | BIT | Scroll downwards |
| OIndex | O | WORD | Index of the selected element |
| OData | O | TEXT | Data of the selected element |
| bUpEnab | O | BIT | State for scroll up |
| bDwEnab | O | BIT | State for scroll down |
Note: If inputs are not connected the object appears with the corresponding default parameters that have been entered in the mask designer. Otherwise the input signal from the function block overwrites the according setting from the parameter dialog.
Visualization
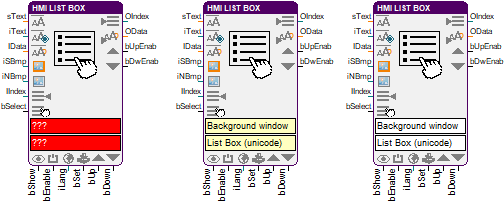
The assignment of the HMI object is displayed in the block by the color of the text boxes. A yellowish background indicates a global assignment. If the assignment is instanceable, the background is white. And at missing or incorrect assignment it is red.
Comment
The index of the elements starts always with 0.